Before You Start
Before you start this journey, you should
understand one thing: You don’t end up with a powerful, durable
antenna for long-term use. For that you want to build, or buy, a
more rugged, commercial- grade unit. In Chapter 3, we will show
you how to make the famous coffee can waveguide antenna, which
can be made quite a bit more powerful and sturdy than this
lightweight paperclip model.
But, with that cautionary note, this paperclip
antenna will work. It will extend the range of the antenna built
into your wireless Network Interface Cards (NICs), and can
produce a gain of up to 9 dBi. And you will be able to point to
it with pride as your entry in that unofficial scavenger contest
to push more and more bits for less and less cost.
There are more efficient and probably more
effective ways to build a Wi-Fi antenna than using a paperclip.
But are there any more fun? What could be better than using the
humble paper clip as the central ingredient for your next
antenna? For many reasons, the paperclip appears over and over
as the ultimate MacGyver tool. It is dirt
cheap, found anywhere and easily hidden in the
palm of the hero’s hand even while his captors pat him down. How
many times have you seen the paperclip open handcuffs and locks
in the movies?
As with many of the projects in this book, local
laws may regulate the usage of such an antenna. You should
familiarize yourself with the local rules and regulations before
you dive in.
What You Need
Use the following list to collect and prepare
the items you’ll need to build your antenna. I’ve listed
dimensions in both metric and foot/inches units where possible.
I’ve included eye protection in the list of items you need to
have before you start. Don’t skip this, or other safety
precautions—please!
Here’s what you need:
Four large paperclips (the largest has to be at least 11.49 cm
(4.52 inches) when straightened)
A
flat wooden spoon, the kind that comes with ice cream cups—or
some other suitable
platform for supporting your antenna prongs
(perhaps a floppy disk)
Wi-Fi pigtail cable connected to your laptop NIC (wireless
PCMCIA card with an external
connector).
Solder iron and solder. An iron in the 15 W to 30 W range will
work fine. Thin rosin core solder
(0.75 mm is a good size) is preferred for electronic work
because acid core solder will
corrode components.
Small bottle or tube of craft glue (virtually any kind will do)
Small wire cutters
Needle-nosed pliers
A
ruler that marks tenths of an inch (such as a drafting ruler
from a craft store) or a metricruler with markings for
millimeters
A
pen for marking hole locations
Eye
protection for cutting wires and soldering
A
pair of vise grips or (even better) a small tabletop vise (the
kind used for making fishing flies)
for holding your antenna securely while working on it
A
drill with a bit slightly smaller than the diameter of the
paperclips or else a thin wire brad
and a light hammer for tapping it through the wood.
You can get more background information on this
antenna design at the following Web sites:
www.xaviervl.com/Antenne/Frisko/
www.seattlewireless.net/index.cgi/MicroTVAerial
www.wifi-montauban.net/communaute/index.php/DisquettAntenna
The pioneers of the paperclip antenna speak
French, and their Web sites are in the French language, but they
include translation links for English (and other) readers.
Some popular Web search engines provide
translation tools for dozens of languages. Visit the language
section at
www.altavista.com or
www.google.com
and use the Language
Translation links to view the sites in other languages.
Sometimes the translated text is a little
choppy, but the meaning comes through.
Choosing a Wireless Card
You will have more success in your paperclip
antenna project if you are working with a good wireless
card.Wireless cards can come with or without built-in external
connectors. The cheaper cards without such connectors are mainly
bought by corporations that assume their employees will only be
connecting to the nearby access points in the workplace
environment.
It is possible to access the internal connectors
of wireless cards (NICs) that don’t have such external jacks—but
doing that is its own separate bit of technical wizardry that
involves “cracking the case” of the NIC to get at its
connectors.
Close-up photos of this feat are online at
www.ivor.it/wireless/pigtail.htm.
However, 802.11b cards are now much cheaper than
they were in the past, and it generally just makes more sense to
buy a new card that comes with built-in external connectors you
can attach the coaxial pigtail to (see Figure 2-12). These come
in several varieties (“MC-Card,”
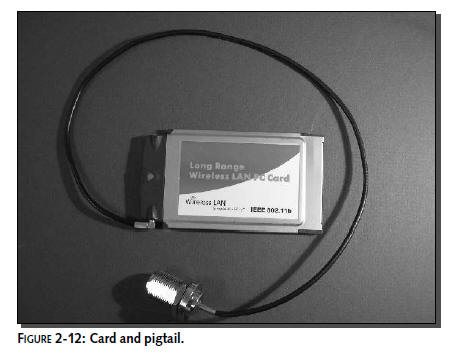
“MMCX,” and others) so make sure that your
pigtail connector matches the kind you have on your wireless
card. Increasingly, the cards seem to have standardized on using
female MMCX connectors—for which the pigtail then needs a male
MMCX connector.
Choosing Platform Materials
This antenna was first made using a wooden spoon
from a French ice cream cup called “Frisko” (hence its name). It
is just large enough to accommodate the four prongs, and just
thick enough to allow them to stand up well.
However, the mind boggles at all the many
possible materials that can be used. These antennas have been
made with medical tongue depressors, floppy diskettes, and small
cardboard tubes. We used a jumbo-sized craft stick, also known
as a popsicle stick. Credit cards don’t work well, because they
are too thin. They don’t support the prongs well (without mounds
of glue) and so the prongs tend to flop over and even touch.
You can glue a wooden clothespin to the platform
you select, so that the antenna can be easily clipped on a
stable mount, like the side of your laptop screen.