Build Your Own Outdoor Access Point
The neighborhood is mapped
out in glorious color maps. There’s
an antenna on your laptop, a cantenna on your desktop in the
basement, and an external antenna
feeding them both. You can surf in the backyard, the front
yard—but not quite from the park down the street.
Your neighbors are starting to ask what’s going
on. They’re feeling left out. There’s only one logical
conclusion: Provide wireless Internet access for everyone on
your street. Hey, why shouldn’t they reap the benefits of your
expertise? Besides it’s a great way to introduce yourself: “Hi,
I’m the geek on your street.Would you like free high-speed
Internet access?” Before long they’ll be throwing parties in
your honor and waving as you walk down the street with your
laptop open—instead of looking at you strangely and shaking
their heads.
Or, maybe you just want to extend your range a
little further, or you just like to climb up on your roof. Read
on for how to get started. You can build an outdoor access point
using several different parts (different enclosures, antennas,
mounting hardware).To get started, you will need the following
items:
➤
Access
point
➤
Power-over-Ethernet
adapter
➤
Waterproof
box
➤
Mounting
hardware
➤
Lightning
protector and grounding wire
➤
Antenna
and mounting hardware (see Chapter 4)
➤
Matching
pigtail (see Chapter 1)
➤
Ethernet
cable
➤
Electrical
tape
➤
Waterproof
sealant
Location, Location, Location
Wi-Fi range is all about line-of-sight. That is,
if you can see the antenna, you can get online. If you can’t see
it, all bets are off. Most of the time the antenna should be
nice and high, where everyone can see it. If you added an
external antenna as described in Chapter 4, then you discovered
this during the site survey.
There’s a Catch-22 with antenna placement. You
need a longer cable to put the antenna in a better place, but
the longer the cable, the more signal you lose. The solution?
Move your access point closer to the antenna—put it right on the
pole. Thiskeeps the cable nice and short and transfers all the
power where you want it—into the air instead of into the cables
and connectors.
Line-of-Sight
As discussed in Chapter 4, good line-of-sight is
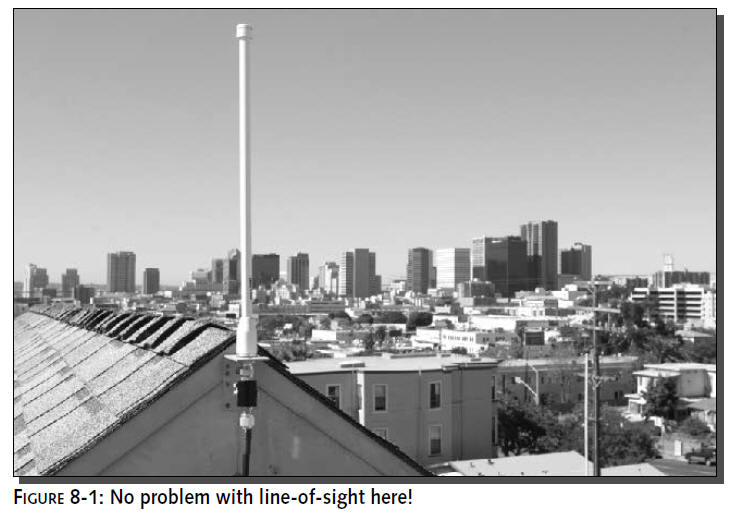
the best predictor of a successful installation. The site in
Figure 8-1 has clear line-of-sight. Consider the following when
trying to pick a good location for outdoor access:
It’s possible to get a good wireless connection through the
outside walls of most buildings, but rarely through multiple
walls, and especially if there are no windows.
Big
leafy trees absorb a lot of signal, especially when they’re wet.
Remember trees if you’re choosing a location in winter, so it
doesn’t slowly stop working as spring arrives
and the leaves grow back.
Use
natural obstacles to block coverage where you don’t want it to
go. The side of a building is
better than the rooftop if you only want coverage in one area.
Remember, you can use an antenna to boost reception at the
receiving end as shown in Chapters 2 and 4. This is handy if
you’ve found the perfect location, except for that one
place where it’s unreliable.
Prioritize within your coverage area. Sometimes there is no
perfect solution, so knowing what’s
most important will help you make tradeoffs.
For example, if you only want coverage across the road,
there’s no need to mount an omni
antenna on a high mast on the chimney. Instead, mount a
directional antenna above your
(street-facing) garage door. It’s much easier to get at, and you
won’t waste half the signal on an
area you don’t need and create radio interference where it’s not
wanted.
Providing Power and Data
Your outdoor access point will need a source of
power and a connection to the Internet.We’ll get sneaky and
provide both of those in a single cable using
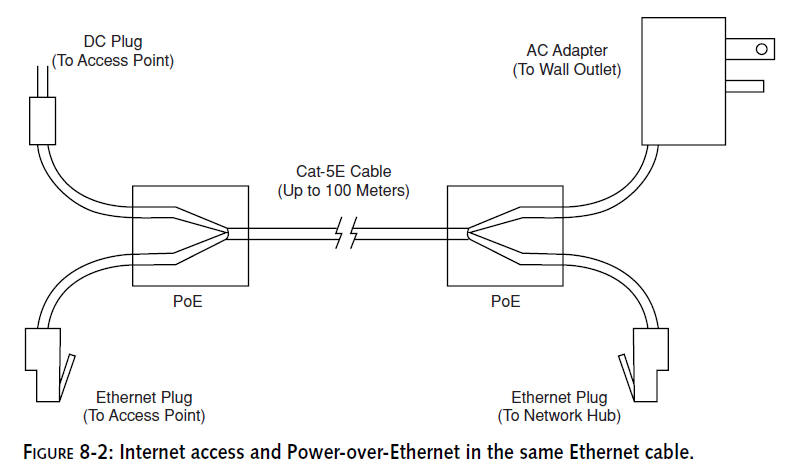
“Power-over-Ethernet” or PoE for short. Running Ethernet cable
is far easier than antenna cable. It’s much cheaper, more
flexible and can go up to 328 feet (100 m) without data loss.
PoE injects direct current (DC) into two of the
unused wires in standard Cat-5 Ethernet cable. By combining the
power and data into a single cable, only one cable is needed for
the longer runs going outside to the access point.
One end of the cable will go into the outdoor
box you’ll build. The other end will go to your digital
subscriber line (DSL) or cable connection to the Internet (or an
existing router). You’ll need a power outlet at that location to
provide power for the access point. See Figure 8-2 for an
example PoE setup.
Something else to consider is whether you want
wired connections to the Internet as well as wireless. A fully
wireless system may give you more flexibility. You could
relocate your cable or DSL box away from your computer where
it’s more convenient for outside installation, such as in the
attic, an upstairs room, or the garage.
Safety
Lightning can strike almost anywhere, but it
generally goes for high points, and if they’re metal, then so
much the better. You should take lightning protection seriously
and plan for it in your installation. Don’t think, “Come on. The
outdoor gear is only worth $100, I’ll take my chances,” because
that’s not the issue. Even with good lightning protection, the
outside gear is likely to be toast anyway. You need lightning
protection to prevent a fire, and to ensure the safety of both
the people and electronics inside the house.
You need to install lightning protection to
protect against fire, and to reduce damage to people and
equipment inside the building.
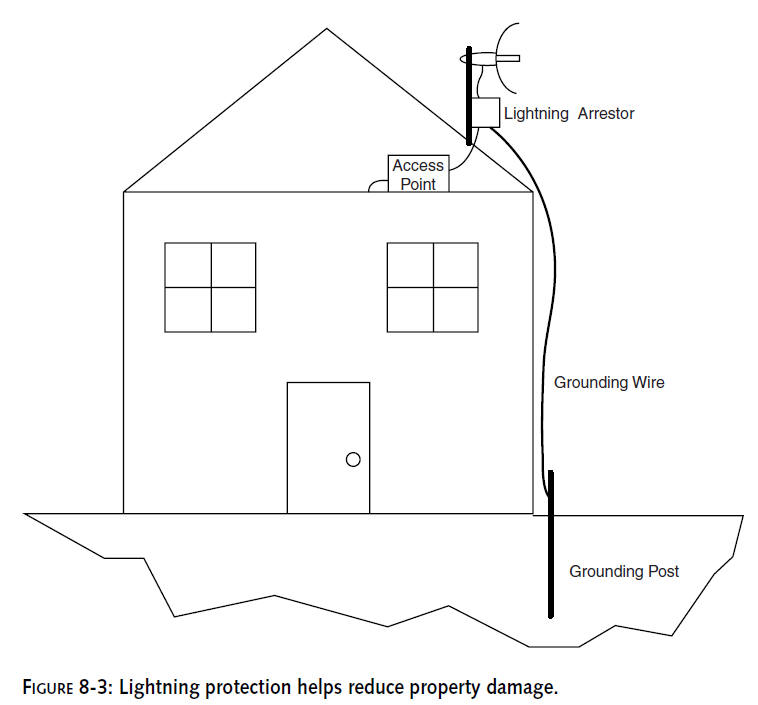
Lightning protection is covered in more detail later in
the chapter, but think about where the
copper grounding wire will go when you’re planning the
outdoor location. If electrical storms are common in your area,
and the mounting location is high and exposed, you
must
take this
very seriously indeed. See Figure 8-3 for a diagram on
lightning strike protection.
Other common sources of accidents are ladders
and high places. Be careful up there. No matter how good a job
you do the first time, chances are you’ll be up there again to
fix something, so it might be worth compromising a little on the
best location to provide safer and simpler access to the
equipment.
Balance the Trade-Offs
There’s rarely a perfect place to put the
outdoor access point and antenna. It’s a balance between the
following factors:
Line-of-sight to the desired coverage are Physical access to the
equipment for ease of installation or repair Suitable route for
Ethernet cable from inside
Suitable route for lightning ground cable
Protection from the elements (sun, rain, lightning, snow)
Aesthetic
appeal: will the neighbors or landlord complain?
You can save some time, effort, and money by
making an early decision about where the antenna and box will
go. For example, if you choose a sheltered location tucked under
an eave, you won’t need a more expensive highly waterproof
enclosure. If you already have a mast with a TV antenna, then
half the job is over.