The following sections cover the differences
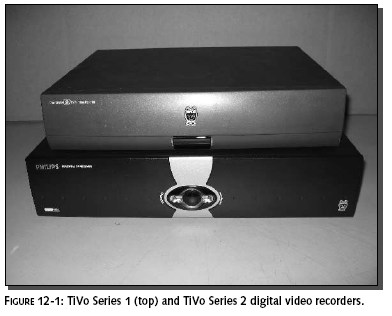
between the two major platforms, Series 1 and Series 2. Figure
12-1 shows the Series 1 and Series 2 stand-alone TiVo DVRs.
Series 1: Wi-Fi for Early Adopters
The original Series 1 TiVo was noticeably
lacking in one area: high-speed connectivity. Hardware
hackers soon developed various methods to escape this
limitation. Online retailers now have a variety of upgrade
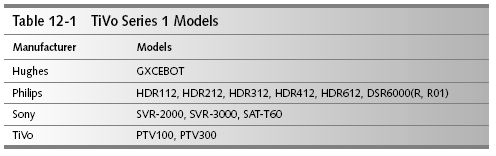
components available for Series 1 TiVo.Table 12-1 shows the
Series 1 models. Series 1 TiVo are no longer being
manufactured.
Installing a broadband adapter (wireless or
Ethernet) in a Series 1 TiVo can be significant, and goes
beyond the scope of this book. However, if you do have a
Series 1, we’ll cover some of the basics to point you in the
right direction.
Series 1 TiVo upgrades require breaking the
case and removing or installing hardware components. Opening
the case may void the manufacturer’s warranty.
Companies like 9th
Tee
Enterprises,
www.9thtee.com,
have made the process easier than it
used to be for Series 1 owners. 9th
Tee provides
two distinct products made for Series 1 TiVo.
9
th
Tee provides
detailed instructions for each adapter:
TiVo TurboNet—Ethernet
adapter
TiVo AirNet—wireless
PC-card adapter
TiVo software version 3.0 or higher directly
supports the TiVo TurboNet Ethernet adapter without the
additional software hacking needed to enable basic network
connectivity. This method is more direct, but does not
provide extra network features like Telnet and FTP service
for the TiVo.
High voltage is present inside TiVo DVRs.
Even when unplugged, a TiVo unit can produce a hazardous
electric shock. Before opening the case of the TiVo, remove
all power (pull the plug) and do not touch any power supply
components.
This step relies on a standard
Ethernet-to-wireless bridge. The Linksys WET11 or the D-Link
DWL-810 are good examples of this easy-to-find product. The
bridge simply connects an Ethernet jack to a wireless access
point as just another wireless client. It effectively places
any wired device onto a wireless network.
Table 12-1 TiVo Series 1 Models
Manufacturer Models
Hughes GXCEBOT
Philips HDR112, HDR212, HDR312, HDR412,
HDR612, DSR6000(R, R01)
Sony SVR-2000, SVR-3000, SAT-T60
TiVo PTV100, PTV300

In this case, the Ethernet-to-wireless
bridge is configured to connect to the TiVo Ethernet jack to
your existing wireless network. Follow the instructions that
come with your particular bridge to configure it for your
wireless network.
To install the TurboNet:
1.
Unplug the TiVo.
2.
Open the TiVo case.
3.
Insert the TurboNet
adapter onto the edge-connector plug.
4.
Install an
Ethernet-to-wireless bridge (see Figure 12-2).
5.
From a PC, configure
the Ethernet-to-wireless bridge.
6.
Boot up the TiVo and
configure the dialing parameters, as specified in the
instructions.
The TiVo AirNet adapter is not supported by
TiVo software version 3.0, but it may be supported in future
versions. Here is a guideline for the AirNet adapter
software install:
1.
Download the AirNet
install CD image and burn it onto a CDR.
2.
Remove the hard disk
drive(s) from TiVo.
3.
Install the drive(s)
in a desktop PC.
4.
Boot the PC using the
CDR (this loads a Linux kernel).
5.
Follow the
instructions to back up the TiVo drive.
6.
Follow the
instructions to add the AirNet driver.
7.
Shut down the PC and
reinsert the TiVo drive(s) back into the TiVo. (If you
changed the hard drive jumper
settings, make sure you return them to the original
positions!)
8.
Insert the AirNet
adapter and a compatible PC-Card into the edge-connector
plug inside the TiVo unit.
9.
Boot up the TiVo unit
and reset the dialing parameters as specified in the
instructions.
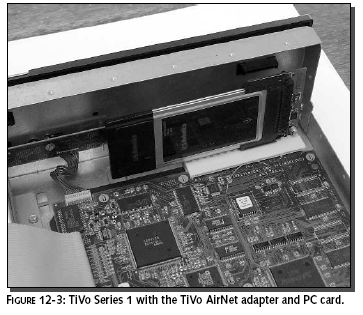
Figure 12-3 shows a TiVo AirNet adapter with
a compatible PC card installed. The AirNet adapter software
adds extra network features to the TiVo software.Telnet and
FTP are now available to directly access the TiVo. To really
go further with a Series 1 TiVo, pick up one of the many
books available on hacking TiVo.
Series 2: Wi-Fi for Late Arrivals
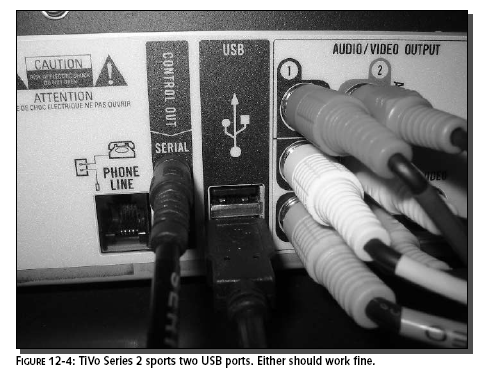
Series 2 TiVo are more readily upgraded to
wireless. There’s no need to open the case. It may take some
experimentation to get it working, though. Series 2 TiVo
include two USB connectors on the back of the unit. Figure
12-4 shows these connectors. Either one can be used
successfully.
Series 2 TiVo are far more numerous than
Series 1 models.To see which Series you have, check the
service number on the back of the TiVo unit. Series 2 TiVo
begin with the following service number prefixes (with more
to come):
110, 130, 140, 1F0, 230, 240, 264, 275, 2F0,
2F4, 2F5
For example, the service number
“240-0000-3298-21EC” starts with 240, and is therefore a
Series 2 TiVo DVR.
There are dozens of wireless USB adapters on
the market. Unfortunately,TiVo only works with a small
number of the most popular adapters. The TiVo software is
patched periodically with driver updates for the most recent
USB network adapters.
When it was discovered that many wireless
USB adapters available in stores did not work with the
current TiVo software, the company offered no timely
solution. “Wait a month or two” was the response from TiVo
technical support. This frustrating but true comment
indicates the software upgrade path used by TiVo central. As
new wireless products are brought to market, TiVo is engaged
in a game of continuous catch-up. If you happen to buy a USB
adapter at the wrong time in the lifecycle, these words may
be your only solace.
To set up your TiVo Series 2 with a wireless
connection, you need to follow these steps:
1.
Get a USB adapter from
your local computer store.
2.
Make sure your TiVo’s
software is up-to-date.
3.
Plug in the adapter.
4.
Configure the wireless
network.
These are discussed in more detail in the
following sections.
Step 1: Raiding the Computer Store
The first thing you need to do to is get
your TiVo connected to a wireless network, which means
you’ll need a USB adapter. This should be as simple as going
to the store and buying one, but unfortunately, it’s not
that easy.TiVo doesn’t support all the major USB adapters,
and support varies by the TiVo software on your model as
well.
You may be tempted to buy your favorite
brand of wireless USB adapter and return home to set up your
TiVo. Yet, the path of least resistance is not always an
option.To ensure a successful installation, raid the store
of every full-size USB adapter available from major
manufacturers.
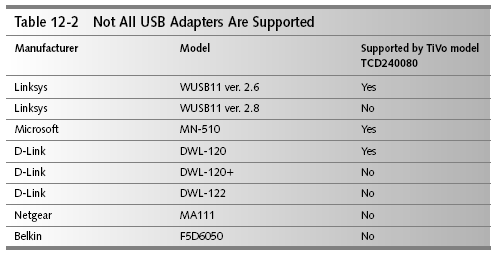
Table 12-2 shows a list of some of the
adapters we tried. Note the subtle distinction between
adapters that are supported and those that are not. The
Linksys WUSB11 version 2.6 works, while version 2.8 did not.
Also,TiVo states support of the D-Link DWL-120, but not the
DWL-120. The “” makes all the difference. Chances are, the
USB adapters listed in the table will be supported by TiVo
eventually. However, as new adapters are released,TiVo will
need to keep updating their software to work with them.
TiVo maintains a list of recommended
adapters at
www.tivo.com/adapters.
Some are directly
supported, while others carry caveats like, “we have
had positive reports on these makes,”
which is the same as telling you to try them. Who
knows if it will work or not.
There is a simple solution:
1.
Visit the computer
store.
2.
Verify their return
policy (shoot for 30 days with no restocking fee).
3.
Buy every USB adapter
from every different manufacturer.
4.
Try them one at a time
until you are successful.
5.
Return all of the ones
that didn’t work.
If none of the adapters work, there is one
more option: Buy a new adapter, and return it as defective
to the manufacturer. When asked what model is needed for
replacement, specify the version number that is known to
work. For example, with Linksys, request the WUSB11 version
2.6 while sending back version 2.8. This trick only works
with products using the same model number. Linksys technical
support recommended this procedure to overcome the TiVo
compatibility problem since they discontinued version 2.6.
Step 2: Ensuring TiVo Is Ready
If this is a new TiVo just out of the box,
make sure it’s connected to a phone line first. TiVo
requires activation through a regular phone line. Also, it
may need to download software updates to bring the version
to a level that will support USB broadband (version 4.0 or
higher).
Many TiVo units are shipped with older
software. This is not a problem because TiVo sends updates
directly over the phone. However, it may take several
connections to the TiVo service and a few reboots to apply
all of the updates. The process can take a couple of hours
with manual intervention, and probably would take days if
left untouched.
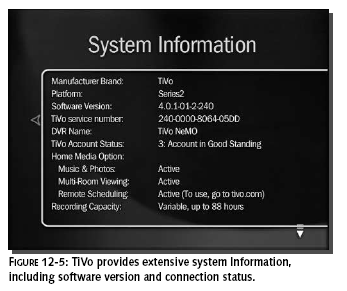
Figure 12-5 shows the system information
screen. Make sure TiVo is running version 4.0 or higher
before inserting a USB adapter. Manually activate the TiVo
update service to get caught up with updates. These menus
vary from TiVo to TiVo. Use this as a guideline:
1.
Press the TiVo button
on the remote
2.
Click TiVo Messages
and Setup
3.
Click Settings
4.
Click Phone and
Network Setup
5.
Click Connect to the
TiVo service now
6.
Press Select on the
remote to start the update procedure
Now go to the System Information Screen, and
follow these steps:
1.
Press the TiVo button
on the remote
2.
Click TiVo Messages
and Setup
3.
Click System
Information
Check the “Software Version” on the first
page. Press Channel Down on the remote to monitor the
“Service Connection: Current/Last Status.” Sometimes, the
status will show that a reboot is required. Perform a
restart by following these steps:
1.
Press the TiVo button
2.
Click TiVo Messages
and Setup
3.
Click Restart or Reset
System
4.
Click Restart the TiVo
DVR
5.
Follow the on-screen
confirmation instructions and observe the warnings
Now check the System Information again. If
the status is “Succeeded,” try another update connection
until the system is at the required software version: 4.0 or
higher.
Step 3: Plugging In
Now that TiVo is running the latest
software, it’s time to start plugging in all of those USB
adapters until one works. The tricky part here is knowing
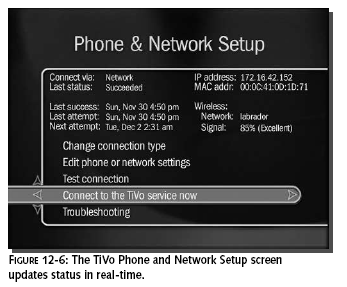
when it has worked. Figure 12-6 shows the best screen to see
network adapter status: Phone and Network Setup. Follow
these steps to get to this screen:
1.
Press the TiVo button
2.
Click TiVo Messages
and Setup
3.
Click Settings
4.
Click Phone and
Network Setup
When an adapter is present and detected by
TiVo, the IP address and MAC address will appear in the top
right corner of the screen. Also, wireless network
information will be displayed just under the MAC address.
TiVo recommends a lot of troubleshooting steps, but you can
circumvent all of the hassle by plugging and unplugging one
adapter after the other.Wait about 30 seconds in between
swapping adapters.
Before TiVo detects its first adapter, the
Phone and Network Setup screen will show an entry like,
“Click here to learn about networking.” This will disappear
when an adapter is detected and it will be replaced with
network options.
Step 4: Configuring for Wireless
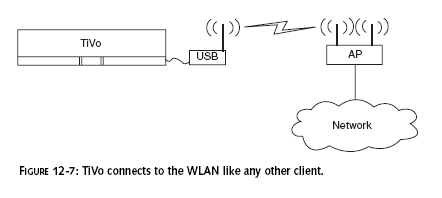
The TiVo connects to your home wireless
network like any other client. The wireless and TCP/IP
settings need to be configured to coincide with the wireless
LAN settings. Figure 12-7 shows a standard wireless network
and how TiVo will connect.
TiVo will walk you through the wireless
network setup. Follow these guidelines:
1.
Go to Phone and
Network Setup
2.
Click Change
connection type
3.
Select Network
4.
Go back one screen
5.
Click Edit phone or
network settings
6.
Select Wireless
Settings
7.
Follow the on-screen
guide to configure the wireless adapter
8.
Check the final status
screen to ensure connectivity. The TiVo will let you know if
it does not connect to the wireless network.
If you’re using WEP on your network (which
is highly recommended) try to use a hexadecimal password
(also called a
WEP key).
This will ensure the same key is used on all devices. Some
alphanumeric to hexadecimal converters follow
different algorithms. Entering an alpha password
like “wi-tivo-link” can be converted differently on
different wireless devices.
Try making names out of regular hex
characters (A-Z, 0-9), like “cafe2feed1decaf4fadedface1.”
Next, set up the TCP/IP settings:
1.
Go to Phone and
Network Setup
2.
Click Edit phone or
network settings
3.
Click TCP/IP Settings
4.
Follow the on-screen
guide to configure the TCP/IP settings
5.
Check the final status
screen. The TiVo will attempt to verify the TCP/IP settings
Now test the network settings by connecting
to the TiVo service:
1.
Go to Phone and
Network Setup
2.
Click Connect to the
TiVo service now
3.
Press Select to
connect
4.
Make sure the screen
displays something like, “Connecting to the TiVo service via
the network.”
Congratulations! TiVo is now connected to
your wireless network. Now there’s so much you can do. The
following sections will explore some of these options. If
you have problems connecting to the TiVo service at this
point, the problem is probably one of two things: an
incorrect WEP key or a TCP/IP configuration problem.
First, double check that the WEP key is
entered correctly. Often, the network will respond well to a
connection, but no traffic is passed because the keys don’t
match. You may wish to temporarily disable WEP on your
access point to eliminate this possibility.
Second, ensure your TCP/IP settings match
those of your network. Check another computer on your
network to see if it uses DHCP (automatic IP address
assignment) and make sure the TiVo matches that setting. If
you are using static IP addresses, make sure you use an
unused IP address for your network and that the Subnet Mask,
DNS, and Gateway addresses all match one of your working
computers.
In Windows 2000 and XP, use the command
prompt and enter
ipconfig/all to
see TCP/IP
settings. In
Windows 98, use the winipcfg command from the Run menu.