Creating a Free Wireless Hotspot
There comes a time in the
life of every wireless fanatic when he or
she wants to share the thrill of wirelessness with every
other human being on the planet, or
at least those who come within range.
Perhaps you have a high-speed Internet
connection at home, which goes unused when you are at work.Why
not let the neighbors use it? Why not let the whole neighborhood
use it? And if your neighbors share with their neighbors...
There are, in fact, several sizable projects
underway based on this vision. As of early 2004:
➤
NYCWireless
(www.nycwireless.net),
dedicated to providing free
wireless Internet service to mobile users in public spaces
throughout metropolitan New York City, had a database of
over 180 nodes or
hotspots.
➤
Houston
Wireless (www.houston-wireless.net),
a community wireless group
promoting pervasive, high-speed wireless
data in urban and suburban Houston, was at 93 nodes and
growing.
➤
Seattle
Wireless network (www.seattlewireless.net),
which envisions a not-for-profit, community-owned
wireless network covering
metropolitan Seattle, had more than 30 nodes operating, and half
a dozen more on the verge of
operating.
➤
The
So Cal Free Net (www.socalfreenet.org)
is rolling out free hotspots and wireless backbone locations in
the San Diego and Los Angeles areas
of Southern California.
➤
The
Personal Telco Project (www.personaltelco.net)
consists of a volunteer group of
Portlanders with over 100 active nodes aiming
to cover the entire city of Portland, Oregon.
➤
The
NoCat network (www.nocat.net),
based in Sebastopol north of San Francisco, listed two-dozen
active sites, almost as many in
progress, and many more that were deemed “interested.”
There are many other free, public wireless
networks all over the world, including Asia, the Middle East,
Australia, New Zealand, the Pacific region, the Caribbean, and
Europe.To get an idea of the magnitude of this phenomenon, check
out the Personal Telco Web site, which lists hundreds of
community wireless groups that are building free and open
networks (
www.personaltelco.net/index.cgi/WirelessCommunities).
The most ambitious of these
envision not just isolated nodes but an interlocking “network of
networks” or
Metropolitan Area Network
(MAN) designed to allow
roaming from site to site within the area
served by the network. Hiccup-free roaming is a technical
challenge that has not been entirely solved at this time,
however.
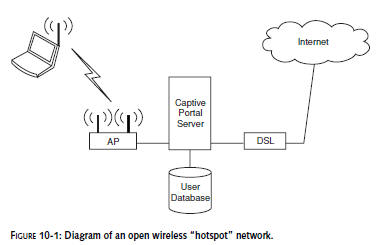
Figure 10-1 shows a common configuration for an
open wireless “hotspot” network. Users with a laptop computer
log in, click “I agree” or authenticate in some manner. And then
they are allowed to access the Internet.
This community-based approach to networking can
allow you to bring high-speed data to your neighborhood, even if
your local telephone companies or wireless ISPs are moving too
slowly, not moving at all, or have tried and failed due to
financial factors. Because noncommercial services can be much
cheaper in the long run (basically, just the investment in
equipment and expertise), they may garner a wider user base than
commercial services could. If even a small percentage of those
users set up their own free wireless hotspots, a “positive
feedback” loop is created, in which the benefits of joining the
“free” wireless community increase, bringing more users and
still more hotspots. (The network effect says that the value of
a network increases exponentially with the number of users.)
If you want to be part of this wireless
revolution, this chapter is for you! In this chapter, you’ll
build a wireless hotspot that can share your Internet connection
with anyone who comes within range, while giving you the ability
to implement a
splash screen
(the first screen the user sees
when they access the hotspot), and control which sites users can
access. The system is designed to support user IDs and
passwords, as well, so you’ll have the
potential to expand to that in the future.
You’ll need the following hardware:
Wireless access point (AP).
A
PC (486 or better) with at least 10GB disk space, 256MB RAM and
two Ethernet network interface cards (NICs). This computer
serves as a gateway between your local
wireless network and the Internet. It will run the Linux
operating system.
At
least one client computer (usually Windows or Mac) for testing.
Each client must have either a
wireless NIC or a standard Ethernet card and cable to connect
to the AP.
A
high-speed Internet connection such as DSL, with an appropriate
wide area network (WAN) device such as a DSL modem and an
Ethernet cable to connect this device to
the Linux computer.
You’ll also need the following software:
Linux. Ideally, you should have Red Hat 9.x with kernel version
2.4.x, with IPtables and gpgv.
NoCatAuth, the free software that will provide the management
and control capabilities for your
hotspot, uses IPtables to route traffic between the two
NICs.We’ll give instructions for
Red Hat 9 in this chapter. You may have to adapt these
instructions to other flavors of
Linux. Another software-related requirement is root access to
the Linux server. You should do
everything in this chapter as the root user.
The
nightly build of NoCatAuth. Download it from the NoCat network
site (www.nocat.net).
It is standard procedure to warn you that a particular nightly
build could be buggy. Peruse the
mailing list a bit before downloading, to see if people seem to
be having trouble with recent
builds. If so, download the most recent stable build. That being
said, when I downloaded NoCatAuth
in early 2004, it looked like the code hadn’t changed since mid-
2002. (I guess they were on to working on NoCatSplash, a
software package being groomed as
the successor to NoCatAuth. Dates on NoCatSplash files were very
recent.)
DHCP (Dynamic Host Control Protocol) server somewhere on your
network. This could be a DHCP
daemon running on your Linux machine (this seems to work best in
most situations), or it could be on your AP or another
server. In general, implementing a
DHCP server is not a huge stumbling block. For instance, the
default configuration for many
access points includes DHCP service. If your network clients are
configured to obtain an IP address
automatically, and they are able to access the network, then
they already have access to a DHCP
server.
If
you want to set per-user bandwidth limits using throttle.fw, you
will need tc installed on your
server. (This is a standard component of Red Hat 9.x.)
Optionally, you can install a local caching DNS (domain name
service) server. You get an option to install a DNS when you
install Red Hat 9.x from scratch.
Be aware that you are undertaking a challenging
project. There are a lot of things that have to go right for
your hotspot to work, and each one of these things is capable of
going wrong in many different ways. Basically, there are five
areas where you may have to do some tinkering:
the AP, the WAN hardware (such as a DSL
“modem”), Ethernet and TCP/IP networking, the Linux computer,
and the client computer(s). If you’re not a guru in all these
areas, here’s an opportunity to learn, and achieve something
cool in the process.
The centerpiece of the solution described in
this chapter is “captive portal” software, NoCatAuth, which you
download free from the NoCat network site (
www.nocat.net)
and
run on a Linux computer, which thus becomes a gateway.
Just the potential complications associated
with this one piece of software can drive you batty.
It is not unusual for questions on the NoCat
mailing list—especially newbie questions—to go unanswered for
days, or even forever, despite sometimes piteous pleas (“Nobody
will help me?”). There is no official support for the NoCat
software, and if you can find somebody to provide support for a
price, the price could be fairly steep (say, $75 an hour).
NoCat isn’t the only software available for
setting up a free hotspot. If you’re interested in checking out
alternatives, a good starting point is
www.personaltelco.net/
index.cgi/PortalSoftware.
But NoCat seems to be the most popular of the free options.
What Is NoCatAuth?
NoCatAuth is a “captive portal” software. A
portal
is a Web site or
service that offers access to an array of other resources and
services. A captive portal is the one in which users are
initially “captured” and restricted
in what they’re able to do. They may be restricted to just a
login screen, or a screen
describing an acceptable use policy (AUP). In that case, they
must log in or accept the policy
before they can do anything else. Alternatively, the captive
portal may allow users to access a
restricted number of Web sites without logging in or agreeing to
the AUP. It is also possible to
include a Skip button on the login screen, allowing the user to
skip the login process.
In this chapter, you’ll set up two basic
NoCatAuth configurations: One uses NoCatAuth’s “Open” mode to
create a portal that does not allow login using a user name and
password, but does redirect users to a splash screen. Users have
to click a button to continue. The other configuration uses
NoCatAuth’s “Passive” mode to create a portal that allows, but
does not require, a login. The user can press the Skip button,
not provide a user name or password, and be automatically logged
in as “unknown.”
You can create a Passive mode NoCatAuth system
in which the user has to log in—no Skip button allowed. However,
this requires that you install not only the gateway component of
NoCat, but also the authorization server (“auth server”)
component. The gateway component provides (or refuses to
provide) access to the Internet. Every NoCat hotspot is based on
a gateway, which manages local connections, enforces locally
configurable firewall rules (and optionally bandwidth
limitations), and times out idle logins. The auth server
displays the login and logout screens in Passive mode (though
not the splash screen in Open mode—that’s served locally at the
gateway) and handles the “backend” processing for the login.
This chapter does not go into any detail about setting up your
own auth server.
There is an auth server at nocat.net that
everyone is free to use. This chapter assumes that you will use
that. There are some very significant limitations for
“outsiders” using this server. In particular, when it hands out
permissions, the auth server assigns one of three classes of
service: Owner (sometimes called “Priority”), Co-op, or Public.
Outsiders always get Public class access. In other words, you
have to create a one-size-fits-all security configuration.
Setting up your own auth server gives you much more flexibility.
Even if you do plan to eventually set up your
own auth server, you probably want to start by getting a gateway
working with the auth server at nocat.net first. That way,
you’ll have a “known good” gateway for testing, and will not be
trying to debug both the gateway and the auth server at the same
time.
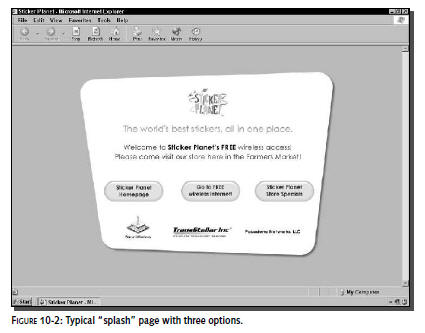
After getting past the splash or login screen
(see Figure 10-2), the user can be redirected to the site
originally requested. In the Open mode configuration, it is also
possible to edit the splash screen to redirect all users to a
site that you specify. (If you have your own auth server, you
can edit the login screen, too.)
In either Open or Passive mode, you can
configure a set of allowed domains, and the user will not be
able to browse any domains other than those. Any attempt to
access nonallowed domains will just bring up the splash screen
or login screen. This can be a bit tricky to configure,
depending on the particular allowed site. The basic
configuration is easy, as explained in
the “Configuring NoCat” section later in this
chapter. However, you may encounter situations where you put a
site into the AllowedWebHosts list and still can’t get through
to it consistently. Instead, you encounter situations where you
are eternally returned to the splash screen or login screen. It
can take some troubleshooting to determine what is wrong and how
to correct it, as you’ll see in the section on “Troubleshooting
NoCat.” Unfortunately, you’ll also see why it is not possible to
guarantee a smooth experience for every user when only a limited
number of domains is allowed.
The NoCat log (
/usr/local/nocat/nocat.log)
records the user’s IP address, the hardware
(MAC) address of the user’s Ethernet card, the URL of the
site that the user originally requested, and what level of
access (class of service) is granted. In Passive mode, the log
also shows the login name, if the
user provides one. Otherwise, it shows “unknown.” All log
entries are time-stamped.
If you were ever required to demonstrate that it
was someone else, not you, who did something on your network
(something illegal, for instance), the MAC address could be
particularly useful, since it is associated with a particular
computer—or, more precisely, with a particular Ethernet card.
This contrasts sharply with IP addresses, which you will
probably be assigning dynamically (using a DHCP server, for
example), so that any given IP address gets used over and over
again for different clients.
Both Open and Passive configurations enforce
idle time-outs. After a configurable period of inactivity, the
user will be forced to go through the splash page or login page
again in order to continue accessing the Internet.
Neither configuration requires any special
client software—just an ordinary browser. This is a major
strength of the captive portal approach. Note that, in addition
to the NoCat software described in this chapter, there is a
NoCat community network operating in Sebastopol, California.
This chapter assumes “outsider” status, as far as this network
goes. That is, I assume that, in the security database
maintained by the NoCat community network, users of your gateway
will not be defined as members of the NoCat community or of any
other group defined in that database.
There is a newer piece of software, NoCatSplash,
which currently did not support authorization at the time I
tested it. It simply displayed a splash screen, forcing the user
to click a button in order to continue. NoCatSplash is billed as
the successor to NoCatAuth. However, when I played with it in
early 2004, NoCatSplash was alpha software, and not as stable as
NoCatAuth. Therefore, I decided to stick with NoCatAuth for this
chapter. However, once you are familiar with NoCatAuth, you will
probably find it very easy to migrate to NoCatSplash, should you
decide to do so.
Risk Management
When you decide to provide wireless data
services, you essentially become a wireless ISP. As such, you
have a responsibility to try to prevent your hotspot from being
used irresponsibly or for illegal purposes. That could mean
anything from spam to child pornography. Although I don’t know
of any cases where a free hotspot operator has been prosecuted
for traffic on his or
her network (and I am not an attorney and do not
mean to offer legal advice), it seems only prudent to take some
basic precautions. Anyway, you’re probably a basically good
person and don’t want your hotspot used for bad purposes. There
are three things you can do to control what happens on your
hotspot, and perhaps cover
yourself if violations of the law or of Internet
etiquette occur:
1.
Make users agree to an
Acceptable Use Policy (AUP). Your “splash” page (the page that
all users are initially redirected to) might say, for example,
that the user will not use your network
to send spam, or access or upload child pornography, and
so on. This doesn’t actually stop
anybody from doing anything, but it demonstrates your good
intentions, and lets “law-abiding”
users know what is expected of them. Either NoCatSplash or
NoCatAuth can ensure that users
click a button before being allowed to do anything else.
Check out the following Personal Telco sites for
more ideas about what exactly you might want to put on your
splash page:
www.personaltelco.net/index.cgi/NodeSplashPages?action=
highlight&value=splash
www.personaltelco.net/splash/
2.
Set up a system that
limits what users can do. Either NoCatSplash or NoCatAuth can
apply some blanket rules to all users. For instance:
As an anti-spam measure, both are configured by
default to prevent outgoing SMTP packets, which prevents most
e-mail clients from sending mail. (Web mail services, such as
Hotmail and Yahoo! Mail, are not affected.) Users can be
restricted to particular Web sites.
In addition, the auth server can place users in
one of the three classes of service (Owner, Co-op, Public),
based on user names and passwords. You can define different
rights and permissions depending on which class they belong to.
For instance, some users can be limited to browsing a few
specific Web sites, while others may be free to browse the whole
Internet. However, you can modify the auth server database in
order to enable the different classes of service. This generally
means setting up your own auth server.
There is also a (“highly experimental”) facility
for throttling bandwidth based on membership in these same
groups. (After you install the NoCatAuth gateway, check out the
throttle.fw file for more information on throttling bandwidth.)
3.
Monitor use. This could
allow you to detect network abuse and take steps to end it. Most
free wireless network operators seem to have done little,
if any, monitoring in the past—a
policy that has been likened to walking around with your eyes
closed. However, both historical
and real-time monitoring are possible.
Historical monitoring involves analyzing the
NoCat log file. Ongoing monitoring of the log file would have to
be automated.Try a Google search on “nocat.log analyzer” to find
out about work that has been done in this area, which you may be
able to take advantage of.
Real-time monitoring could be based on a tool
like MRTG (Multi Router Traffic Grapher), which produces
graphical images at regular intervals (every 5 minutes by
default) representing traffic on network links. You could use
this to detect a user flooding your network with traffic, for
example, either maliciously or unintentionally. (MRTG may come
free with your Linux system.To download it or just to find out
more about it, go to www.mrtg.org.)
To get more detailed information on who is causing the problem
and what exactly they are doing, you could go to the NoCat log.
You might also use a packet capture utility such as
Ethereal, a
free network protocol analyzer for Unix and Windows. (See
www.ethereal.com.) This
type of analyzer gives you the most detailed information, though
not always the easiest to interpret.
You may have reasons other than security for
wanting to monitor your network. For instance, perhaps you want
to be able to limit each user’s free access to a particular
length of time, such as half an hour. Or perhaps you are
starting with free access now, but want to position yourself to
charge in the future. Time limitations (other than time-outs
after a period of idleness) and billing are not standard parts
of the current NoCat implementation.
However, a number of approaches have been
discussed and tried. One approach starts by analyzing the log
file to determine usage. A more flexible and sophisticated
approach is to record information in a MySQL database. Perhaps
the most natural approach, however, is integrating with the
RADIUS authorization and accounting server. To find information
on this, try
www.pogozone.net/projects/nocat/, or do a Google search
on “nocat radius.”