Configuring Your Access Point
If the existing network consists of a single
computer hooked directly to a cable or DSL modem, you should add
a broadband router before continuing. You’ll need a router to
share the connection between multiple computers, including
computers connecting via the wireless access point.
The one exception to this is if
all
your computers will
connect via a wireless connection and
your access point supports connection sharing (usually
via a combination of services called
NAT and DHCP). If your access point has two or more
Ethernet ports as well as wireless support,
then it almost certainly supports sharing. Check the
documentation to be sure.
Preparation
You can configure your wireless access point for
your network in many ways.To leave room in this book for more
projects, it’s assumed that you’re adding this new outdoor
access point to an existing network. This network already has a
working broadband connection connected via a broadband router
that provides facilities for sharing the connection between
multiple computers.
In geek speak, your network provides DHCP, NAT,
and gateway services.
Now it’s time to get the access point
configured. The steps are:
1.
Download the most recent
firmware file from the manufacturer’s Web site to your computer.
This has the latest bug fixes and it may not be on your
device already.
2.
Unplug the computer from
your network and plug it into your access point. Follow the
access point setup directions to access the
administrative interface via a Web browser.
3.
Skip the suggested
configuration steps and update the firmware using the file you
downloaded earlier. This option is
usually under a System or Tools menu. If you get stuck, see
the manufacturer’s Web site from where you downloaded the
firmware.
4.
Again connect to the
administrative interface via a browser. Now you can start the
configuration. The configuration
steps that follow require a few settings and decisions. Of
course you can change anything you
want later on, but after people start using the system some
things are easier to change than
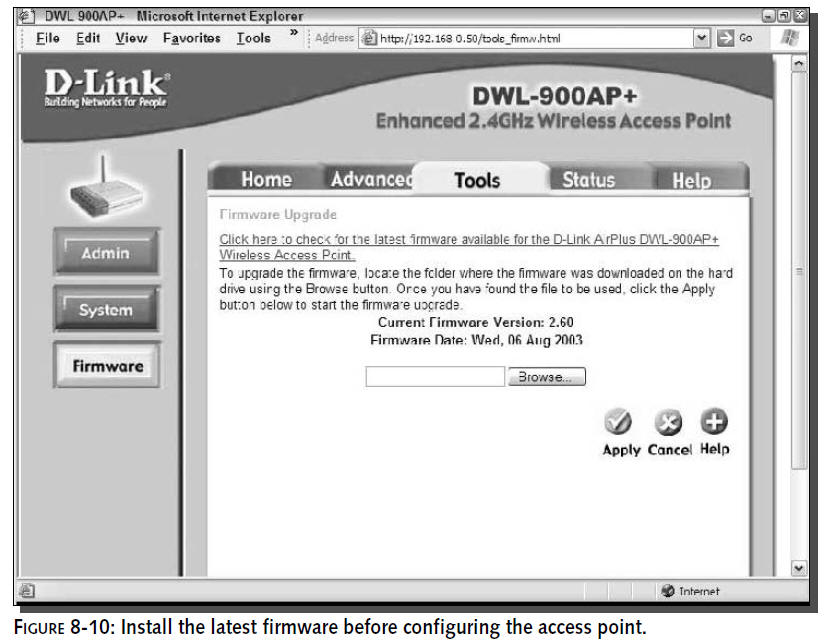
others. See Figure 8-10 for an example of upgrading the firmware
on an access point.
Always perform the firmware upgrade through the
Ethernet port on the access point, not through the wireless
connection. A mis-applied firmware upgrade could result in
damage to the access point and a warranty replacement through
the manufacturer.
Access Point Password
It goes almost without saying that you should
always set a new password for your access point so people can’t
change the configuration and even disable or hijack it. Make
sure that you
change the password for the administrative user
(“admin” in most cases) and the user-level passwords, if
applicable.
SSID
Choose a unique SSID instead of the default that
comes with your access point. This reduces confusion for people
trying to use your system and allows you to easily identify your
system from other wireless signals you may find nearby.
It’s considered good form to provide an SSID
that allows someone to contact you if necessary. This is useful
if your new access point starts interfering with their signal.
You could use a Web site name or even an e-mail address. Or you
might use your house or apartment number with or without your
street name depending on your expected coverage area. Most
systems support SSIDs that are case-sensitive, are 2 to 32
characters long and include most common punctuation characters.
Some examples of SSIDs you could use are:
house922,
www.socalfreenet.org,
myname@fastmail.fm,
janewireless. Avoid mixing upper- and lowercase letters to
prevent configuration problems.
The SSID is essentially the personal address of
your access point. This is what people will see when setting up
their computer to get on your wireless network.
WEP
Wired Equivalent Privacy (WEP) was designed to
provide security for wireless networks. If you want to start a
debate amongst a group of wireless experts, ask them whether you
should use WEP on your wireless network.
Those against will say that WEP can be cracked
easily and will cite the seminal paper
www.isaac.cs.berkeley.edu/isaac/wep-faq.html
in their support and point
to one of
several readily available programs that automate
breaking a WEP key. Those in favor will say that enabling WEP
will stop most casual people from accessing your network and you
should turn it on as a matter of routine.
As is so often true, both sides are correct and
the right answer for your network is “it depends.”
Wireless security is a large topic that fills
entire books: How
Secure is Your Wireless Network?
by
Lee Barken is a good starting place.Wireless
Security End-to-End
by Brian Carter and
Russell Shumway is another good book on the subject.
The short answer is to leave WEP off unless you
have access to all the computers that will use your access
point. If you turn WEP on at your access point, you’ll need to
configure each wireless computer individually to use it. And no
one else will be able to use your network until their computer
is similarly configured—except the patient hacker running the
cracking tools of course.
For example, if you want to have an open access
point that others can share, leave WEP off. If you want to share
with a select group of neighbors, turn it on and then configure
each of their computers—and be prepared to reconfigure them when
they mess up the settings. If you do use WEP, also enable Media
Access Control (MAC) filtering on your access point (most of
them support it). It will require you to gather the unique MAC
address of every computer that will use your access point, but
you can do this when you’re setting up WEP on each of them. See
your access point manual for details.
Wireless LAN Security
Use good security practices whether you use WEP
or not. Here are some steps that will keep your data safe from
prying antennas:
�
Install a firewall on each wireless computer. Free firewalls are
available from
www.agnitum.com/
www.zonelabs.com/
�
You
may need to hunt around a little to avoid the paid versions,
though. This stops the spread of worms within your wireless LAN
and limits the damage if one does get loose.
�
Install anti-virus software and keep it updated. In addition to
the standard off-the-shelf products, consider smaller companies
like www.nod32.com that provide competitive bulk
licensing and yearly renewals if you call them
directly. Then as you help people get onto your wireless LAN,
you can offer them virus protection too. A comprehensive list of
products is available at
http://directory.google.com/Top/Computers/Security/Anti_Virus/Products/
�
Secure your e-mail. Well-known Web mail services like yahoo.com
and hotmail.com provide an optional
secure logon, but they don’t secure the messages. Consider
switching to a provider like
fastmail.fm that provides secure Web pages for all your
messages, just as your online bank
does. If you use an e-mail program, be sure to set the Advanced
settings to “This server requires a
secure connection (Secure Socket Layer or ‘SSL’)” (or similar)
for both outgoing and incoming
mail. If your e-mail provider doesn’t support SSL for e-mail,
switch to one that does (for example,
fastmail.fm
again).
�
When
you use Web sites with sensitive personal data, double-check
that they are in ‘secure mode’. Most Web browsers indicate this
with a lock icon of some sort, and the URL will
generally begin with
https://
instead of the usual
http://.
�
Surf
completely anonymously, if you care, by using a third-party-paid
service like
www.freedom.net
www.anonymizer.com
A good overview of these services is found at
www.webveil.com/matrix.html
and a general directory is available at
http://directory.google.com/Top/Computers/Internet/Proxies/
Wireless or not, continue to use good security
practices like choosing good passwords (a mix of characters and
symbols), not reusing the same password in multiple places, and
changing your passwords regularly. A good password helper
program like
www.roboform.com can
make this much easier to manage.
Channel
Your access point can operate on any of the 11
channels (plus a few more in some countries). However, each
channel actually overlaps with two or three channels on either
side. Thus only three distinct channels are actually available:
1, 6, and 11. However, recent research suggests that a scheme of
1, 4, 8, and 11 is a reasonable alternative.
Do a mini-war drive in the region your outdoor
access point will cover, as described in Chapter 6. Pay
particular attention to the channels used by any access points
you discover. Choose the least occupied channel for your access
point. When the access point is installed, you may need to
adjust the channel based on real-world usage. Fortunately, any
client computers using your SSID will automatically adjust, so
this is not as critical as, say, the SSID you choose or the WEP
key you set (if you enable WEP).
LAN Settings
When you first configure your access point, it
will be on a private LAN consisting of just your computer and
the access point, so the settings used don’t matter as long as
they’re compatible. However, when you add the access point to
your main LAN, it will need to have compatible settings so it is
accessible and doesn’t cause conflicts with other devices on the
network. The settings needed are:
IP
address: A unique address for the access point. Choose a number
that’s easy to remember and doesn’t
conflict with other devices. For example, many routers use the
range from 192.168.0.1 to 192.168.0.254, and often
reserve the first number,
192.168.0.1, or last number, 192.168.0.254, for their own
address. So you might choose
192.168.0.2 as the address for the access point.
Subnet mask: On most home networks, this will be set to
255.255.255.0.
Gateway: Usually the router acts as the gateway and the address
commonly ends in .1. Thus, 192.168.0.1 is a common setting.
DNS
server: This value is supplied by your Internet Service Provider
(ISP) so refer to their setup
instructions. Sometimes the router will forward or cache DNS
requests so it may be the same as
the gateway value. One way to
determine these settings is to find the same settings on a
computer on your network. Usually
the router supplies these settings automatically via Dynamic
Host Configuration Protocol (DHCP). On a Microsoft Windows
machine, you can find the value from a command prompt as
follows:
C:\>
ipconfig
/all
Windows IP Configuration
Host Name . . . . . . . . . . . . : mike
Primary Dns Suffix . . . . . . . :
Node Type . . . . . . . . . . . . : Unknown
IP Routing Enabled. . . . . . . . : No
WINS Proxy Enabled. . . . . . . . : No
Ethernet adapter Local Area Connection:
Connection-specific DNS Suffix . : local
Description . . . . . . . . . . . : Intel(R)
PRO/100 S Desktop Adapter
Physical Address. . . . . . . . . :
00-02-B3-B7-xx-xx
Dhcp Enabled. . . . . . . . . . . : Yes
Autoconfiguration Enabled . . . . : Yes
IP Address. . . . . . . . . . . . :
192.168.1.199
Subnet Mask . . . . . . . . . . . :
255.255.255.0
Default Gateway . . . . . . . . . : 192.168.1.1
DHCP Server . . . . . . . . . . . : 192.168.1.1
DNS Servers . . . . . . . . . . . : 192.168.1.1,
66.80.131.5
Lease Obtained. . . . . . . . . . : Monday,
March 22, 2004 9:53:47 AM
Lease Expires . . . . . . . . . . : Monday, March 22, 2004
10:53:47 AM
Here you can deduce that Internet Protocol (IP)
addresses range from 192.168.1.1 to
192.168.1.254 with a subnet mask of
255.255.255.0. The gateway is 192.168.1.1, and the DNS
servers are both the gateway and an alternate of
66.80.131.5.
Configuration Example
The DWL-900AP
has a configuration wizard that guides you through the
installation. It is useful to skip the wizard and configure the
settings screen-by-screen to see some of the useful choices that
the wizard doesn’t offer and to see how to use them.We’ll walk
through these selections in this section.
Basic Wireless and LAN Settings
If the access point has several operating modes,
set it to “access point” (also called “infrastructure access
point”). Other modes are used in other wireless applications,
such as a wireless relay (see Chapter 9), or to connect to
another access point. Find the page in your access point to set
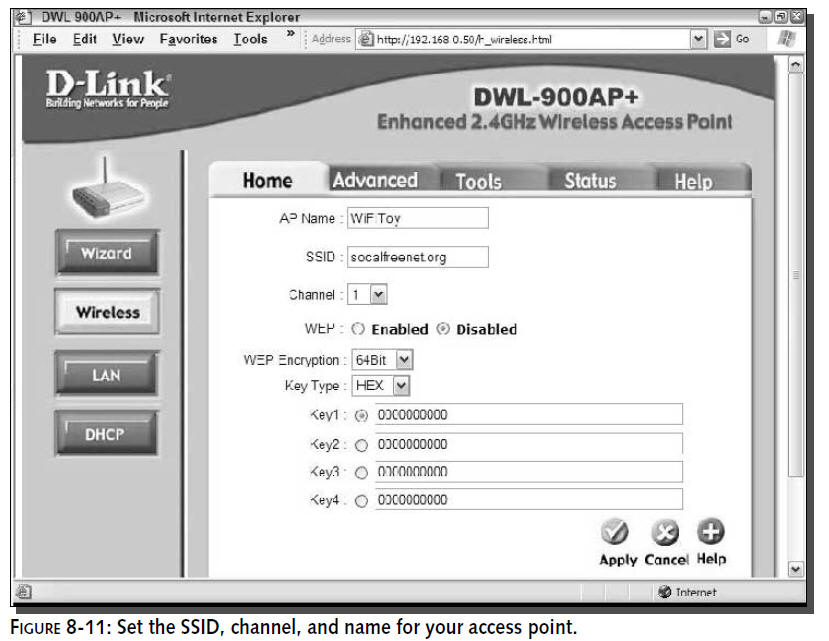
the SSID, channel, and often a name for the device (see Figure
8-11). The name is sometimes visible to client software, but is
mostly useful for maintaining multiple access points as it
sometimes gets confusing which one you’re editing when you have
several.
Be sure to save the wireless settings, and then
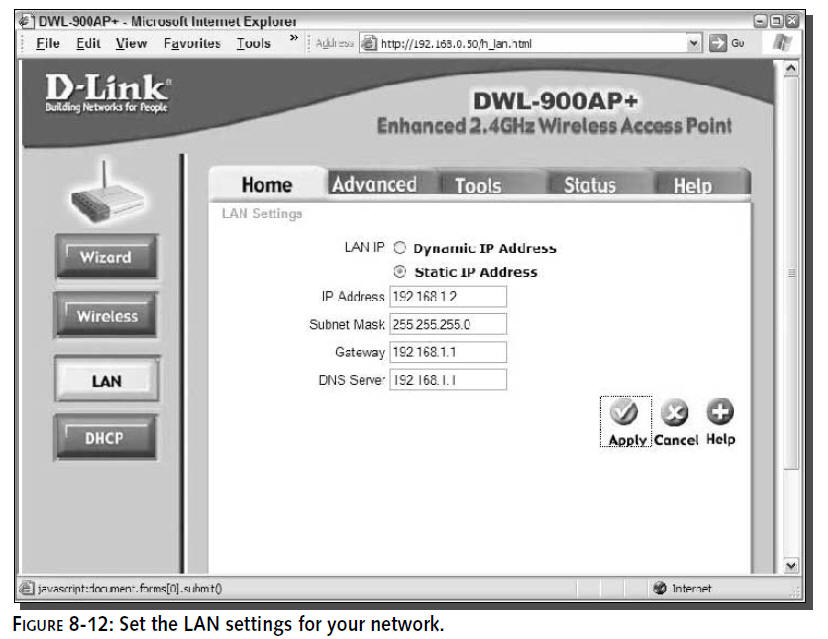
find the page to set the LAN settings you calculated. Select the
“Static IP Address” setting. If you choose “Dynamic IP Address,”
the access point will work when it’s plugged into your network,
but it will be hard to find it via the browser to administer it
as you won’t know what address to use! (See Figure 8-12.) After
you enter and save the LAN values, you’ll need to either adjust
your computer network settings to match, or plug both your
computer and the access point back into the LAN and continue the
configuration from there.
Setting Your Password and Saving the
Configuration
Be aware that your access point is live from
here on, so the next step is to change your password. The
browser address of the access point will now be the static IP
you entered (for example,
http://192.168.1.2).
If you can’t get back into the configuration of
your access point, you may need to reset it to the factory
default settings and start over. The instructions for this are
usually on the CD that came with the access point or on the
manufacturer’s Web site. The same steps are used if you forget
your password.
Change your administration password at the
appropriate page and then log back in to continue. At this
point, it’s useful to save your configuration settings. Most
access points allow you
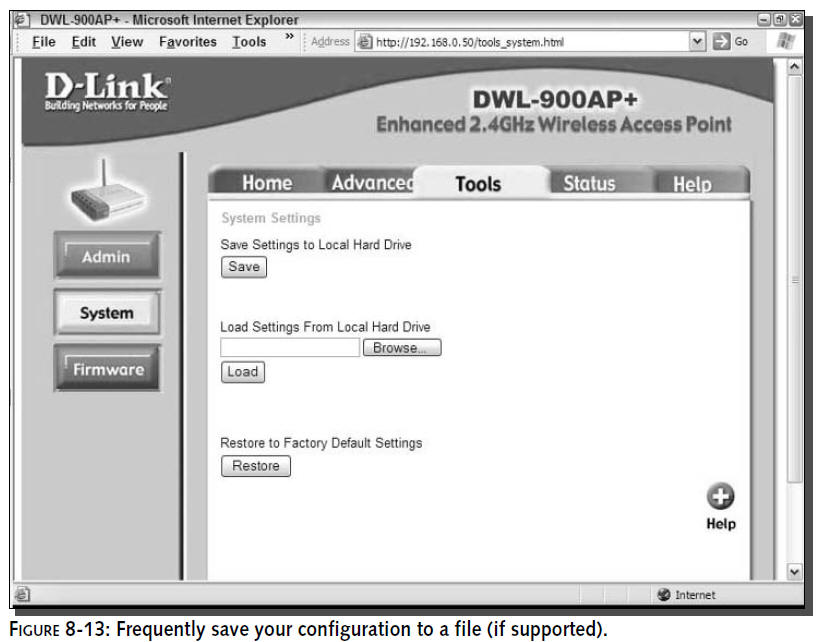
to download the
settings to a file on your computer so you can easily restore
them later. As you now have the access point basically
configured and accessible from your network, it’s a good time to
save the settings. As you continue changing other settings, you
can save again (and again) to ensure you don’t miss anything.
Figure 8-13 shows the save-to-file setup page.
Saving your settings becomes even more important
if you turn on WEP and start using MAC filtering to protect your
network. It’s tedious to re-enter MAC addresses and key values
(and be sure to keep a backup copy).
Advanced Settings
Your access point will have a page of advanced
wireless settings somewhere that contains items like those shown
in Figure 8-14. Some are more useful than others:
Antenna
selector:
It’s important to set this if your access point has two
antennas, because you’ll only be using one. It isn’t always
clear whether left and right are while facing the
front or back of the access point, but the manual or
manufacturer’s Web site should clarify.
Speed (Tx/Basic Rate):
You can increase the range of your network by decreasing the
maximum allowed speed. In theory, it shouldn’t make any
difference because Wi-Fi should
automatically downgrade to a lower speed if the connection is
poor. In practice, it’s useful
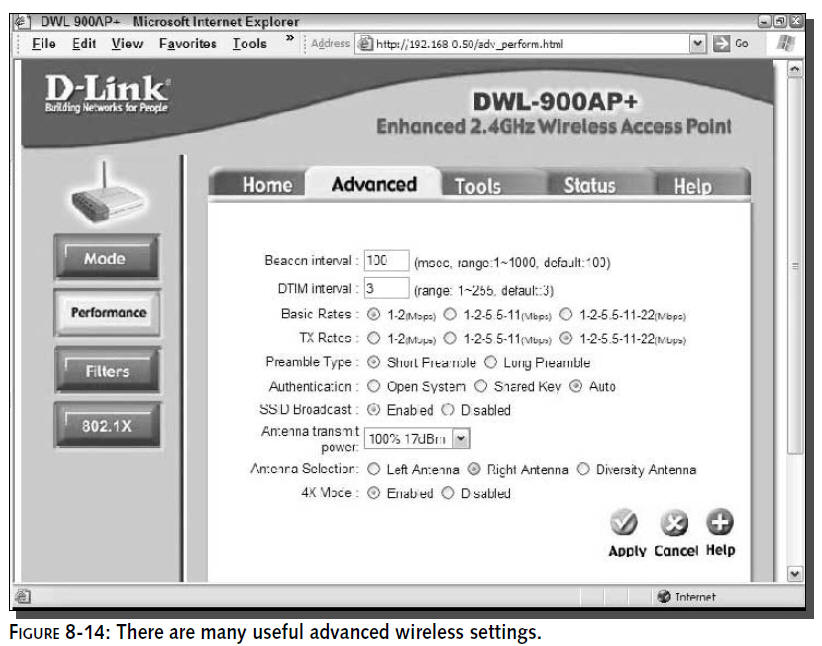
to force everyone to a lower speed and save the overhead
of all the hunting around for the best speed. Note, though, that
you can significantly lower the maximum speed of your network
and reduce sharing among users, because now all transmissions
will take longer and everyone has to wait until each
transmission completes before getting a turn.
Authentication and SSID Broadcast
: If you use WEP, you can
change these two settings to Shared
Key and Disabled, respectively. These hide your system more
effectively from hackers. Sometimes
disabling the SSID Broadcast can cause problems with some client
adapters, so test this first.
Power: If there
are a lot of access points in your area, it’s good form to turn
down the power if all the computers
connecting to you are close by. This reduces interference to
other users. This is also a good security practice as it
makes your access point less visible
and your network harder to access from further away.
Experiment to find a reliable value.
If you’re in doubt about what the settings do,
change and test them one at a time. Be sure to save your
configuration changes so you can revert to a previous version if
something stops working.
Don’t be afraid to explore other settings. If
the supplied documentation doesn’t explain the settings
adequately, a Web search will quickly find more information.
When you’re all done, save the settings to disk,
power everything off, take a break, and then come back and do
one final test. If possible, find a computer that hasn’t had
wireless installed before, then add an adapter and ensure that
you can configure it to work with your access point. If you’re
using WEP and advanced security measures, this is especially
important, as some of the details are hard to get just right.
It’s much easier to work out what’s wrong with
all the pieces of the puzzle right in front of you, than when
half the gear is up a pole in the rain.