Attaching a High-Gain Antenna
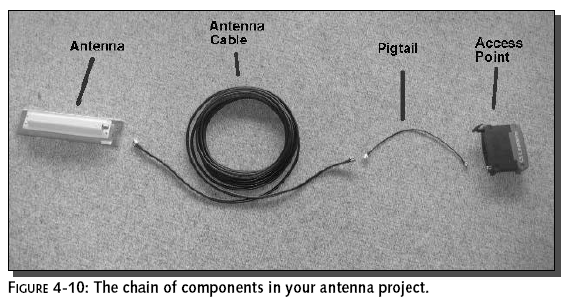
To attach the high-gain antenna to the access
point, you basically build a “chain” with four links in it: the
access point, the pigtail, the antenna cable, and the antenna.
(See Figure 4-10.) To attach the antenna to the access point,
follow these steps. Assuming the access point is already working
correctly, and you have good cables with the right connectors,
these three steps should take just a few minutes. (We’ll talk
more about the cables in a minute.)
1.
Configure the access point
to use only one of its two antennas (optional, but recommended
if your access point supports it).
2.
Attach the pigtail cable
to the access point.
3.
Run the antenna cable from
the pigtail to the antenna.
4.
Position and install the
antenna.
Try using the Cantenna you built in Chapter 3 to
boost gain on an access point. This antenna works as well on an
access point as it does on a laptop computer.
Step 1: Configure the Access Point to Use Just
One Antenna
Since you’re going to all the trouble of
installing a high-gain antenna, you want to make sure that the
access point uses it consistently. You configure this using the
access point’s firmware. It takes just a minute or two. Here is
a guideline for the process on a Linksys WAP11 or BEFW11S4
access point:
1.
Access the access point
using your browser. If you haven’t changed the IP address, it’s
192.168.1.1. Enter your username and password. If you
haven’t changed it yet, the default
is a blank username, and a password of “admin”.
2.
When you get to the Setup
screen, click the Advanced tab in the upper-right corner.
3.
In the Advanced section,
click on the Wireless tab.
4.
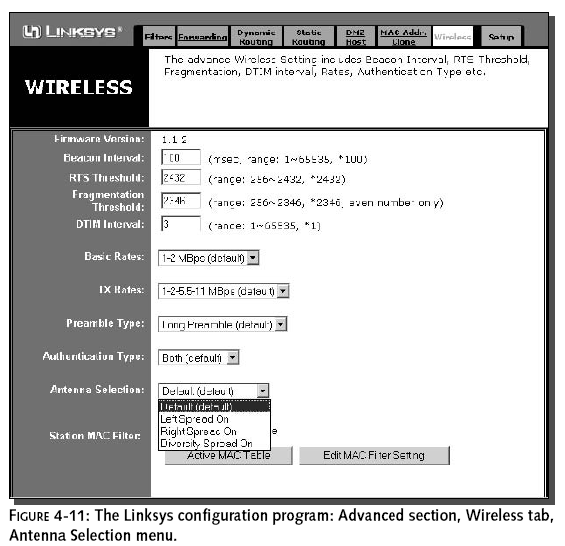
Go to the Antenna
Selection drop-down menu, and select either Right Spread or Left
Spread, depending on which antenna output you are using.
(You look at the access point while
viewing the front panel when determining right and left.)
5.
Click the Apply button at
the bottom of the screen.
Figure 4-11 shows the Wireless tab in the
Advanced section of the Linksys configuration program. In case
you’re curious, the Default setting is a “diversity” setting, in
which both antennas are active. Diversity Spread should
automatically select the antenna with the strongest signal.
However, since you know which one is always going to be the
high-gain antenna, we’re choosing not to depend on the automated
function.
Some access points transmit through only one
antenna. Make sure you choose the correct antenna. Vendors tend
to refrain from listing these engineering anomalies, so your
best bet is to test the antenna after installation to make sure
which transmit antenna works best.
Step 2: Attach the Pigtail Cable to the Access
Point
Connecting a pigtail to an access point can be
extremely easy, if you have a pigtail with the proper connector,
and if the access point manufacturer designed the antenna for
easy removal. Linksys access points, for example, have
easy-to-remove antennas. The difficulty of finding the proper
connectors argues for buying rather than building pigtails.
Linksys Makes It Easy
If you have a Linksys WAP11 or BEFW11S4 access
point, connecting your high-gain antenna to the access point is
a snap, because these Linksys access points have detachable
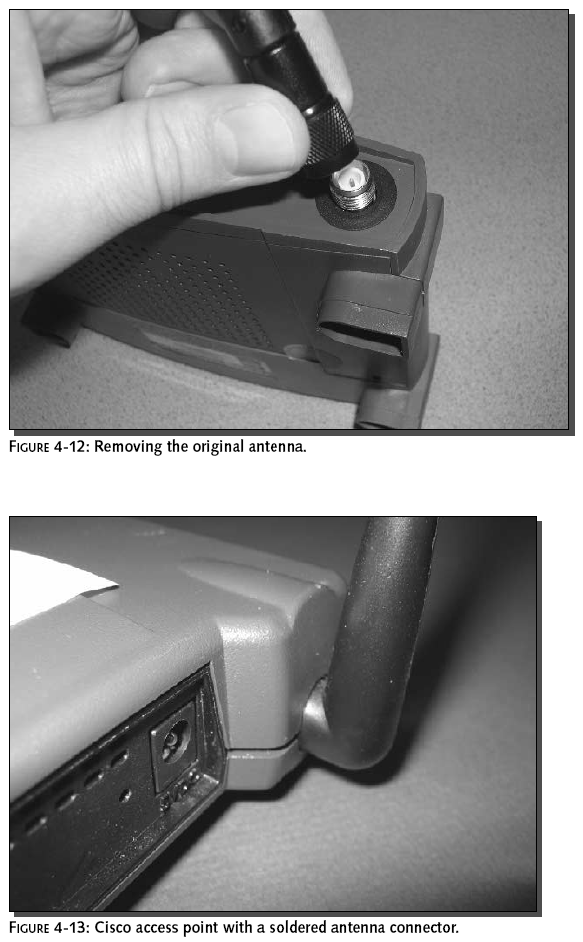
antennas. (Here’s where your opposable thumb comes in). Just
grip the antenna base firmly between thumb and forefinger and
turn counter-clockwise to remove. (See Figure 4-12.)
Other access points may not be so easy.We
recommend an access point with external connectors and
detachable antennas, because otherwise you may have to open up
the access point, disconnect the existing antenna wires, and
solder a new connector onto the wires—undoubtedly voiding any
warranty in the process. Figure 4-13 shows a hard-wired antenna
in a Cisco access point.
The FCC Makes It Hard
The other area where you might run into a slight
hiccup is in building a pigtail to connect the access point to
the antenna cable. The antenna side of the pigtail is no
problem: Your antenna cable probably has standard female
N-Connectors. So, to make the connection, the pigtail needs to
have a standard, easy-to-find male N-Connector.
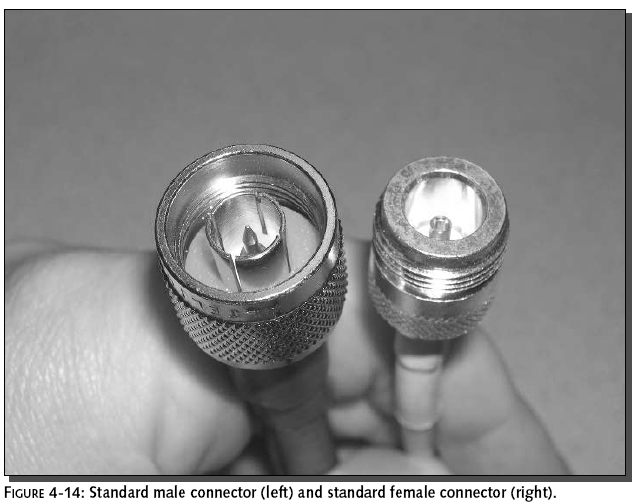
The male connector has a pin in the middle. The
female connector has a socket. In addition, male connectors have
threads on the inside of the connector body, while female
connectors are threaded on the outside. (See Figure 4-14.)
The problem stems from the connector on the
access point. The FCC mandated weird connectors for Wi-Fi
antennas, because they were afraid that hobbyists would do
things like connecting high-gain antennas to access points and
possibly jack-up the power of their wireless networks beyond the
legal limit. (Why would anybody want to do that?) They didn’t
make it illegal to hook up a high-gain antenna, but they did try
to ensure that you would use only antennas specifically designed
for the wireless system. They did this by specifying connectors
that you couldn’t find in your local Radio Shack, and which are
incompatible with standard antenna connectors.
Linksys, for example, satisfies the weirdness
requirement with reverse polarity (RP) TNC connectors. At first
glance, Reverse Polarity (also called “Reverse Gender”)
connectors look like normal male and female connectors. On
closer inspection, however, you’ll find a major difference:
The male connector has a socket, and the female
connector has a pin. The Linksys access points, for instance,
have Reverse Polarity female connectors (female body with a
pin), so th
e
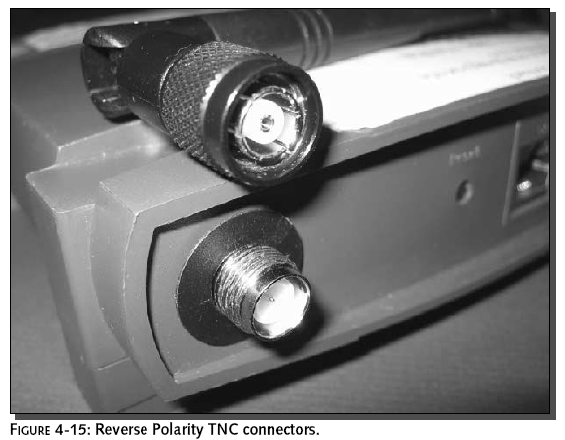
pigtail has to have a Reverse Polarity male
(male body with a socket). Figure 4-15 shows RP-TNC connectors.
Another common example is the reverse polarity SMA connector
used on many D-Link products. Figure 4-16 shows RP-SMA
connectors.
Don’t confuse RP with Reverse Threading (RT),
which apparently also satisfies the weirdness requirement, and
which refers to male bodies threaded to turn counter-clockwise
to tighten, unlike normal male bodies, which turn clockwise to
tighten. The FCC’s desire to thwart users wishing to attach
standard antennas to Wi-Fi equipment has been less than entirely
successful. However, the weirdness requirement has created a
thriving pigtail industry, which you will now be supporting with
a modest purchase (assuming you follow the advice in the next
paragraph).
In Chapter 1, we recommended purchasing
pre-configured pigtails for wireless client adapters, because of
the hassle of soldering the tiny connectors needed to fit PC
card connections. Buying pigtails is the easy way to go for
access points as well. There aren’t any tiny PC card connectors
to deal with. But you would probably have to special-order the
RP connector for the pigtail anyway, so why not just go ahead
and special-order the pigtail itself?