Testing and Using NoCat
This section describes some basic tests to make
sure your hotspot is working properly. These tests are designed
to be performed in order, without leaving any of them out. In
other words, each test assumes the configuration changes of the
previous test.
Test #1 Accessing NoCat
This tests whether you can access the NoCat
network site, which you should always be able to do in the
default configuration, since NoCatAuth puts no restrictions on
access to this site by default.
1.
Start with the default
NoCat configuration file (/usr/local/nocat/nocat.conf).
If you have already edited this
file, you can rename your edited file to a unique name, copy
gateway.
conf from
the NoCatAuth
install directory and
rename it nocat.conf.
In the default configuration file,
everything below LogoutURL
is commented out,
with the exception of
ExcludePorts
25.
Important settings include:
GatewayMode: Passive
AuthServicerAddr: auth.nocat.net
2.
Reboot the gateway machine
and start NoCatAuth by typing
/usr/local/nocat/ bin/gateway
at the command
prompt.
3.
Assuming a smooth
start-up, as described above in “NoCat Installation,” go to a
client machine and associate with the wireless AP by selecting
its SSID. (For testing purposes,
you could also access the gateway from a cabled workstation.
From the gateway’s point of view,
there is no difference between wired and wireless clients coming
in over the same interface, such as
eth0.)
4.
Start your browser and
type nocat.net
in the address bar. You
should immediately be taken to
http://nocat.net
If you get
an error message indicating that the server cannot be found, the
problem may be DNS-related.Try typing
216.218.203.211 in the
address bar. This is the IP address of
nocat.net.
If this works, then apparently the problem was in resolving the
name
nocat.net to an IP
address. Some things you might check:
Make sure the DHCP server is handing out good DNS addresses. You
should be able to determine this
through the DHCP server management interface. Make sure the
client machine is either configured to automatically obtain its
DNS information or is configured
with known-good DNS addresses.
Try
setting one or more known-good DNS addresses in the
DNSAddr
parameter in
nocat.conf.
If you only make adjustments on the client, type
/usr/local/nocat/bin/gateway
-R at the Linux
command prompt, to reset any firewall rules that have been
changed.
Keep a terminal window open on the Linux box
just for starting and restarting the gateway. Press CtrlP to
repeat the previous command. (This works even after you have
rebooted the machine.) Since you may be repeating the same
command many times, this can save you a lot of keystrokes.
If you change things on the server side, reboot
the server and restart the gateway. Then try navigating to
nocat.net again.
Test #2 Accessing Google
This tests whether you can access Google, which
requires you to go through the login screen.
1.
Type
www.google.com
in the browser address
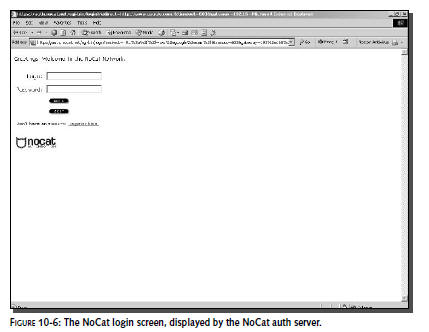
bar. You should get the NoCat login
screen, as shown in Figure 10-6.
2.
Click the Skip button.
3.
After a small NoCat Logout
Agent window opens (don’t close it—it keeps your connection
alive and allows you to log out), you will be taken to the
Google site. From there, you should
be able to go to any site on the Internet, without any further
involvement with NoCat.
Test #3 Registering and Logging In
This is pretty much like the last test, except
that you will register and log in this time, instead of hitting
the Skip button.
1.
Type
/usr/local/nocat/bin/gateway –R
at the Linux
command prompt, to reset NoCatAuth
firewall rules.
2.
On the client, type
www.google.com
in the browser address
bar. You should get the NoCat login screen, as shown in Figure
10-6 above.
3.
Click “Register here.”
4.
Fill out the registration
form and click “Register.” A “thank you” screen will be
displayed briefly. Then you will be
returned to the login screen.
5.
Log in with the name and
password that you just created. As in the previous test, you
should get the NoCat Logout Agent window and then be forwarded
automatically to Google. From
there, you should be able to go to any site on the Internet.
Test #4 Checking IPtables
NoCatAuth uses IPtables to create firewall
rules. Therefore, IPtables gives you a way to “look under the
hood” and determine whether NoCatAuth is operating properly.
This test describes one simple interaction with IPtables.
1.
Open a new terminal window
on the Linux box, and type
IPtables -L at the
Linux command prompt.
Near the bottom of the displayed information,
you should see the following, but with the IP address of your
client instead of 192.168.2.100.
Chain NoCat_Inbound (1 references)
Target prot opt source destination
ACCEPT all -- anywhere 192.168.2.100
The line beginning
ACCEPT is a firewall rule that says traffic using any
protocol (prot all), from
anywhere, and destined for your client will be accepted.
2.
Go to the terminal window
where you restarted the gateway. Use CtrlP to bring up the
/usr/local/nocat/bin/gateway
–R command, and hit
the Enter key to reset NoCatAuth
firewall rules.
3.
Go back to the terminal
window where you executed the previous
IPtables –L
command. Use CtrlP to
bring up the command again, and hit the Enter key. You will see:
Chain NoCat_Inbound (1 references)
Target prot opt source destination
The rule allowing traffic to get your client has
been removed.
4.
Try refreshing the Google
screen. You will get the NoCat login screen, because in step 2
above you “erased” NoCatAuth’s memory of you.
Test #5 Open Mode
This test checks Open Mode operation.
1.
Edit nocat.conf as
follows:
GatewayMode: Open
2.
Optionally, change
GatewayName
to reflect the change. You
might make it “My Open NoCat
Portal,” for instance.
3.
Reboot the computer and
then use /usr/local/nocat/bin/gateway
or CtrlP to
start NoCatAuth.
4.
On the client, type
www.google.com
in the browser address
bar. You should get the NoCat
splash screen, as shown in Figure 10-6.
5.
Click “Login.” You will be
taken to the Google site. From there, you should be able to go
to any site on the Internet. (Note that there is no NoCat
Logout Agent window in this case.)
Test #6 Allowed Web Hosts
This test makes sure that the “Allowed Web
Hosts” feature is working properly.
1.
In nocat.conf, uncomment
MembersOnly 1
and
AllowedWebHosts.
Edit as follows:
AllowedWebHosts: rockisland.com
MembersOnly 1
(Leave
GatewayMode: Open)
2.
Reboot the computer. Use
/usr/local/nocat/bin/gateway
or CtrlP to start
NoCatAuth
3.
On the client, type
www.google.com
in the browser address
bar, or attempt to refresh the Google screen, if it is already
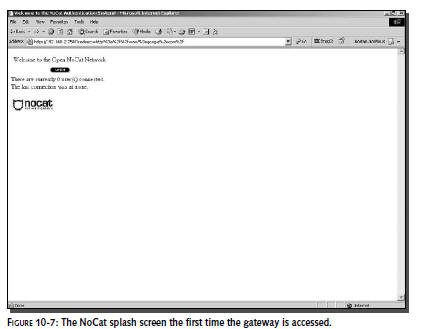
open. You get the NoCat splash screen, as shown in
Figure 10-7. The first time the gateway is accessed, a
“none” message will appear. It will
be replaced by a date and time after the first login.
4.
Click “Login.” You are not
taken to the Google site, because it is not an allowed site.
Instead, you are returned to the splash screen.
5.
Type
www.rockisland.com
in the browser address
bar. You are taken to that site. If
you attempt to go to any other site, you will be returned to the
splash screen.
6.
Change back to Passive
mode, reboot, and restart the gateway. The behavior is
essentially the same, except that
you get the login screen instead of the splash screen.
Note that a user whose initial request is for an
allowed site will never see the splash screen at all. This is
the intended behavior of AllowedWebHosts. However, if you want
all users to view and accept an AUP, it is an unfortunate
behavior. One possible workaround is editing the splash page to
always redirect to a particular site (see instructions in the
next section) and putting the AUP on that site instead of on the
splash page.
Test #7 All Roads Lead to Rome
This tests a configuration in which all users
are redirected to one particular site, no matter which site they
initially request.
1.
Make a copy of the splash
page (/usr/local/nocat/htdocs/splash.html)
so that you can always go back to the original.
2.
Open the splash page using
your preferred text editor. (In Red Hat, you can get to the
gedit editor by clicking on the red hat, then selecting
Accessories ➪Text
Editor.) Toward the bottom of the
page, where you see value“$redirect”,
substitute a URL for
$redirect. For
example: value�“http://www.rockisland.com”
(be sure to include the
http://.)
3.
Make any other changes you
wish, as well, in the splash file. This is your chance to insert
an AUP, for instance. In addition, since users are not
logging in, you may want to edit
the splash page so that it has a Continue button rather than a
Login button.Toward the middle of
the page, where you see src=“images/login.gif,”
substitute
src=”images/continue.gif.”
If you want to see
all the possible button images,
look in /usr/local/nocat/htdocs/images.
Or you can create a new image and use it, instead.
If you have multiple allowed sites, you can put
links to all those sites on your splash page. Be sure to include
the http://,
like this:
<a href=”http://www.rockisland.com”.Rockisland,
4.
Save the file.
5.
Edit
nocat.conf,
to change back to Open mode. Leave the other settings as shown
in the previous section.
6.
Reboot the computer and
restart the NoCatAuth gateway.
7.
On the client, type
www.google.com
in the browser address
bar, or attempt to refresh the
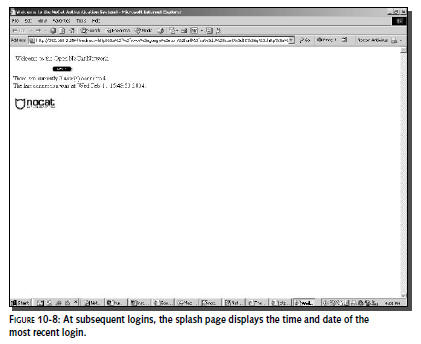
Google screen, if it is already open.You get the NoCat splash
screen, as shown in Figure 10-8.
8.
Click “Login.” You are
immediately taken to
www.rockisland.com.With
splash.html edited in this fashion,
all users will be forwarded to
www.rockisland.com
when they
click “Login.” If there are other allowed domains in the
AllowedWebHosts
parameter,
users will be able to navigate to those domains from
www.rockisland.com.