Pre-Install Setup
You have to install and configure your network
hardware before installing NoCat. There are three basic areas
you need to work in: the AP, the Linux box (including
configuring the two Ethernet cards), and the WAN connection
(which I will assume to be DSL, for this discussion).
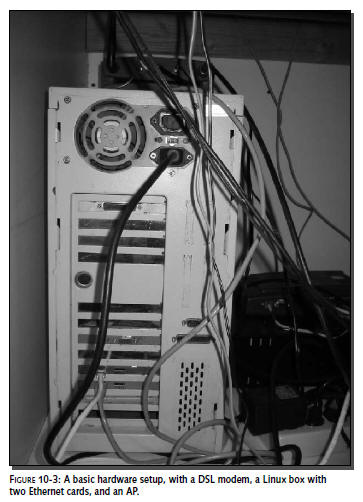
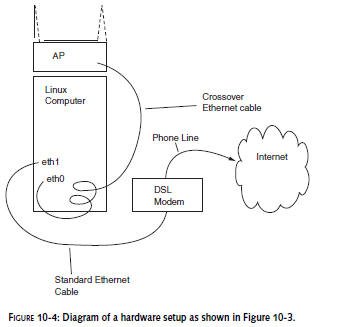
The basic hardware setup looks like that shown
in Figures 10-3 and 10-4. It involves three boxes: the wireless
AP, the Linux gateway and the DSL “modem.” One Ethernet card
connects to the DSL modem. The other Ethernet card connects to
the AP. The names assigned to the Ethernet cards in Linux
(“eth0” and “eth1”) are typical. However, you can assign any
names you want (using System Settings, Network in Red Hat).
If you don’t already have your DSL working, it’s
probably best to make sure that things are at least minimally
functional on the Linux side first. Then get the Linux box
talking to the WAN.
Finally, add the AP into the mix.
The Linux Box
To set up your NICs on the Linux box, click on
the red hat and go to System Settings Network. A minimal
requirement here is to have two active NICs. If one or both are
either not on the list or inactive, things are not going to
work. In addition, the status should be ok.
If one of the cards is inactive, try clicking
Activate. It may activate, or you may get an error message
giving you a clue about what is wrong.
If one of the cards is not on the list, click
the New button and use the installation wizard to install it. If
nothing else seems to get a card working, you may want to try
deactivating, deleting, and reinstalling the card. It only takes
a few minutes, and it’s a low-risk operation, if you make sure
to write down all the information necessary for reinstalling.
So, before you delete a card, write down all the information in
all the tabs on the Network Configuration screen (Devices,
Hardware, IPsec, DNS, Hosts), as well as the information
available by clicking the Edit button.
Software Installation for a NIC
The procedure for installing a card is as
follows. Click the New button. Select “Ethernet connection” from
the “Device Type” list, and click the Forward button in the
lower right. Hopefully, on the “Select Ethernet Adapter” screen,
both your cards will be there in the list, making it easy to
select them. If not, click on “Other Ethernet Card” and choose
from the drop-down menu based on your knowledge of the
manufacturer and model of the card. Do not worry about the empty
boxes in the “Resource” section, or the “Unknown IRQ.” Although
you can set these things manually, they usually auto-configure
correctly. Click “Forward.”
The information you enter on the “Configure
Network Settings” screen will be crucial to making your NoCat
server work correctly. One potentially easy way out is to accept
the defaults, “Automatically obtain IP address settings with
dhcp,” and “Automatically obtain DNS information from provider.”
If this works, fine. If not, you can go to System Settings
➪ Network
➪
Edit and try something else. If you end up having
to set static IP addresses (because automatically obtaining them
doesn’t work, for whatever reason), there are many right ways,
and probably more wrong ways, to configure your network.
Here are three general principles you should be
aware of:
1.
You can’t successfully
configure your NICs in isolation from the other components of
your network. Thus, network setup may be an iterative
process, in which you tinker with
one part of the network (such as AP configuration), and then go
back and change other parts of the network (such as NIC
configuration) to make them compatible.
2.
No two devices on your
local network can have the same IP address.
3.
Each NIC must be
configured to talk directly to the network device to which it is
connected. That generally means being in the same Class C
network. In terms of IP addressing,
that means that, of the four sections of the IP address, the
first three are the same. For
instance, if the IP address of your DSL modem is 192.168.1.1,
the NIC that connects to your DSL
modem will have an address like 192.168.1.XXX, where XXX is a
number from 2 to 254. (It can’t be
1 in this case, because that’s already taken by the DSL modem.)
Similarly, if your wireless AP is 192.168.2.1,
the NIC that connects to your DSL modem will have an address
like 192.168.2.XXX, where XXX is a number from 2 to 254. You may
find that it is easiest to set static IP addresses for both
NICs. If you do this, I recommend assigning them to different
Class C networks, which means having different numbers in the
third section of the IP address (called the “network number”).
For example, 192.168.1.254 and 192.168.2.254.
First, however, make sure that the DSL modem and
the AP use those same Class C network numbers. Otherwise, you’ll
find that you are unable to talk to the DSL modem and AP. You’ll
get a “connection refused” message in your browser, because you
violated rule number 3 above.
There are at least three other items that you
may have to set: the subnet mask, the default gateway, and one
or more DNS addresses. The subnet mask basically says which
portions of the IP address define the subnet. Assuming that you
are using Class C networks, as we suggested, the subnet mask
should be 255.255.255.0, indicating that the first three
sections of the address define the subnet.
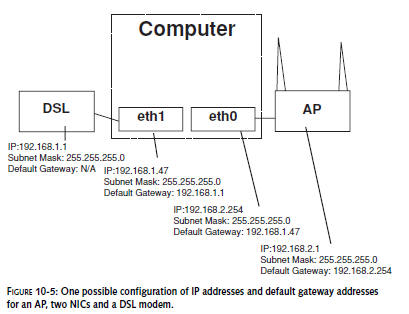
The default gateway is the address of the next
device in line along the path to the Internet. Figure 10-5 shows
one possible setup for IP addresses and default gateway
addresses for the AP, two NICs, and the DSL modem. DNS permits
“resolving” domain names like
www.google.com
into IP addresses. Thus,
getting the correct addresses for
the DNS servers is crucial for making things work. If you use
your provider’s DNS servers, you should be able to ask
your ISP what IP addresses are for the
provider’s DNS servers. Or you may get the DNS server
addresses automatically using DHCP.
Your DSL modem may also function as a DNS
server, in which case one valid DNS address would be the address
of your DSL modem, such as 192.168.1.1 from our examples above.
When you have finished filling in the “Configure Network
Settings” screen, click “Forward.” On the “Create Ethernet
Device” screen, review the information displayed to make sure it
is correct. If it isn’t, click “Back” and correct the
information. Otherwise, click “Apply.”
You’ll be taken back to the main “Network
Configuration” screen, where you can activate the new card.
Finally, go to the command prompt of the GNOME terminal, (click
on the red
hat ➪
System Tools ➪Terminal)
and type service network restart.
Any time you want to check the settings of these cards, go to
the command prompt of the GNOME terminal(click on the red hat
➪ System Tools
➪Terminal) and type
ifconfig.
Testing, Testing
Once your NICs seem to be configured correctly,
open the browser on the Linux box and make sure you can access
both the DSL modem and the AP. You do this simply by typing the
IP address of the device in the address bar at the top of the
browser. You should either get instant access to the device, or
else a login screen.
If you get an error such as “connection
refused,” the problem could be a bad cable, a loose cable, or a
crossover cable used where a standard cable is required. Or you
may have violated rule number 3, as discussed above. You could
also have connected to a bad port on the device.
The WAN
If your service provider has turned your service
on, and it is properly configured on their side, you should be
able to follow their instructions and get things working. One
possible wrinkle is that you may prefer to run DHCP on your
Linux box, whereas the provider’s instructions may assume that
the DSL modem will be the DHCP server. Remember that you should
not have two DHCP servers accessible to any DHCP client. So, if
you are using the Linux box for DHCP, you should turn off the
DHCP capability on the DSL modem and the AP.
If the Linux box and the WAN device are
configured correctly, you should be able to browse the Web from
the Linux box. If you can’t, see if the lights on the front of
the DSL modem indicate a good WAN connection and a good Ethernet
connection. Use the browser to access the DSL modem and check
out its status screen. If everything seems OK on the DSL modem
side, then you probably have a problem in the Linux box
configuration.
The AP
With many APs, the recommended setup is to put
the AP in bridged mode and use a crossover cable to connect to
the Linux box. However, what “bridged” means here is simply that
the AP is transparent to the IP network, acting as a simple
Ethernet bridge. For example, your clients would not use the
address of the AP as their default gateway. Instead they use the
address of the Ethernet card that is connected to the AP.
Clients essentially do not see the AP. Instead, they see through
it to the Ethernet card.
Unfortunately, terminology is not consistent
among AP manufacturers or models. The Linksys WAP11, for
instance, has a “bridged” mode in which it can only talk to
other Linksys WAP11s. Do not use the bridged mode on the Linksys
WAP11 for this project. The Linksys WAP11 is inherently a
transparent Ethernet bridge and does not need to be put into any
special mode to act that way.
When you’re buying an AP for NoCat, the simpler,
the better. If you have a more sophisticated AP, set it up in
its simplest mode. For example, the AP may have a “gateway”
mode, which would be preferable to a “router” mode.
Whether you should use a crossover cable depends
on how the AP port you are using is wired. On the WAP11, you
should always use a crossover cable when you are not connecting
to a hub. Since you are connecting directly to a NIC in this
case, you would use a crossover cable with the WAP11. Some APs
have both crossover and “straight” wired ports, and you can
generally use either one, as long as you use the right kind of
cable with it. You can usually tell whether you are using the
right kind of cable by looking at the lights on your AP, to
determine whether it is seeing a good Ethernet connection on the
port.
Unfortunately, there are a thousand things that
can go wrong with hardware, IP, DHCP and DNS setup. Make sure
that the hardware and basic networking functions are working
correctly before jumping into the NoCat install. You’ll be glad
you did.