

Murmuring Merlin
Programming sounds
Even with your picture-perfect puppet and circuit, Merlin won’t murmur a thing without sounds programmed into the sound synthesizer chip. For this part, you have to study a bit on the software provided by the manufacturer. SpeakJet doesn’t provide a lot of documentation for using the software, but we felt that the chip was the best bet for our puppet because it offers so many cool options for creating sounds.
The steps that we provide here are just an introduction to programming the SpeakJet. The SpeakJet user guide is available at
www.speakjet.com, under the Documentation heading. If you need more information, we suggest you try the SpeakJet discussion forum at http://groups.yahoo.com/group/speakjetYou can get the PhraseALator software that you use to program the chip
at http://magnevation.com/software/PhraseALator.zipThe manufacturer manual for the PhraseALator can be found at
www.speakjet.com and check under Documentation to see whether it’s been posted. By using this chip and software to program it, you can get some pretty neat functionality. For example, at your disposal is a built-in set of 72 speech elements, 43 sound effects, 3 octaves of musical notes, and 12 touch tones. By mixing and matching these and controlling the pitch, rate, bend, and volume settings, you can produce just about any sound, phrase, or musical tones you want.After you install the software on your computer, you can simply assign preloaded sounds to the circuit of this project, which we cover in the next set of steps. Or, you can get fancy and start programming sounds or even words of your choosing. If you want to get fancy, it will take some playing around to learn the software (which is beyond the scope of this book). As we said, not much extensive documentation is available for it at this point, but with a little trial and error, you can get the hang of it.
For our purposes, we used the sounds that the manufacturer preloaded. Here are the steps involved in this procedure:
1. Open the PhraseALator software and click the Event Configuration button.
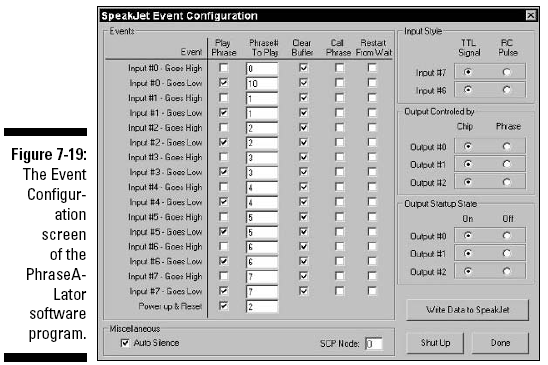
The upcoming Figure 7-19 shows the SpeakJet Event Configuration that we loaded onto our chip. The items in the Phrase# to Play column in this figure indicate phrases that the manufacturer has preloaded.2. Select the check boxes in the Play Phrase column only for input events listed as Goes Low.
You do this so that the SpeakJet activates when you first press and then release the switch. See the note and table after these steps for help in choosing which check boxes you must select. (The simple route is to just select all the Goes Low inputs, as shown in Figure 7-19.)3. Connect the box to your computer by using a serial port cable to program the SpeakJet.
Check over your circuit to make sure that no wires are loose or touch another wire — which could cause a short — before hooking them up to your computer.4. With the box connected to your computer, simply click the Write Data to SpeakJet button in the Event Configuration screen of the SpeakJet program (as shown in Figure 7-19).
5. After you finish programming the chip, disconnect the box with the electronics from the computer.
The event number in the SpeakJet software Event Configuration window doesn’t always match the pin number in the SpeakJet IC — that would be too easy. Here’s a list of event numbers and corresponding pin numbers. We wired switches to Pins 2, 4, and 7, so we use Events 6, 4, and 2.Event Pin
0 9
1 8
2 7
3 6
4 4
5 3
6 2
7 1